How to Keep Landscape Rocks in Place: Landscaping with rocks can undoubtedly enhance the aesthetics and personality of your outdoor space. However, maintaining the stability of these decorative rocks can be a daunting task. Whether you’re facing strong winds, heavy rains, or simply striving for a well-maintained garden, knowing how to keep landscape rocks in place is essential. In this guide, we’ll provide you with a comprehensive set of step-by-step instructions and invaluable tips to ensure the success of your landscape rock project. So, let’s get started and transform your outdoor space into a stunning haven with the assistance of I Haul Landscape Service for all your landscaping needs.
Clear the Area & Put Fabric Down
Before you begin placing your decorative rocks, it’s essential to prepare the ground properly. This step ensures a stable foundation for your rock garden. Follow these instructions:
Clear the Area
Start by removing any existing grass, weeds, or debris from the area where you intend how to keep landscape rocks in place. This initial clearing process ensures a clean and even surface for your landscaping project.
Use Landscape Fabric
Landscape fabric acts as a protective barrier between the soil and your decorative rocks. It serves a crucial role in preventing weeds from sprouting through the rocks and spoiling the aesthetics of your garden. Follow these steps:
- Lay the landscape fabric over the cleared area, covering it entirely.
- Cut the fabric to fit the space precisely, ensuring there are no gaps.
- Overlap the edges of the fabric pieces by a few inches to create a seamless barrier.
The landscape fabric will help maintain the cleanliness and organization of your rock garden, making it easier to manage in the long run.

Put Low-Maintenance Plants Between the Decorative Rocks
Enhance the beauty of your rock garden by introducing low-maintenance plants between the decorative rocks. Not only do these plants add a touch of greenery, but they also play a vital role in stabilizing the rocks. Here’s how to do it:
Choose Low-Maintenance Plants
Select plants that require minimal care and won’t compete with the rocks for space. Some excellent choices include succulents, groundcovers, and ornamental grasses. These plants thrive in various conditions and won’t overcrowd your rock garden.
Plant Strategically
To create a natural barrier around your decorative rocks, follow these steps:
- Dig small holes in the landscape fabric, one for each plant.
- Gently place the selected plants into the holes.
- Ensure the plants are well-spaced, allowing them room to grow without overcrowding.
After planting, water the new additions thoroughly to help them establish their roots. These low-maintenance plants will not only enhance the aesthetics of your rock garden but also contribute to its overall stability.
Get Extra Support from Concrete or Sand
To ensure the long-term stability of your landscape rocks, consider adding extra support through the use of concrete or sand. These measures help prevent shifting or settling of the rocks. If you’re wondering where to get big rocks for landscaping, you can explore local landscaping supply stores or quarry options in your area for a wide selection of suitable rocks. Here’s how to go about it:
Concrete Support
Using concrete can provide substantial stability to your landscape rocks. Follow these steps:
- Plan where you want to add concrete support around the perimeter of your rock area.
- Dig trenches or form molds to define the concrete borders.
- Mix concrete according to the manufacturer’s instructions and pour it into the prepared trenches or molds.
- Level the concrete surface with a trowel, ensuring it’s even and well-cured before proceeding to place your decorative rocks.
Concrete support adds a robust foundation for your rocks, making them less susceptible to displacement.
Sand Base
A sand base is an alternative method to distribute weight evenly and prevent settling of the landscape rocks:
- Once you’ve cleared the area and placed the landscape fabric, spread a thin layer of sand over the fabric.
- The sand should be evenly distributed, creating a level surface for your rocks to rest on.
- Gently place your decorative rocks on top of the sand, ensuring they’re stable and well-balanced.
The sand base helps to minimize the risk of rocks sinking into the ground and provides additional support.
Consider Adding Steps or a Walkway to the Area
If your landscape rock area includes elevation changes or pathways, adding steps or a walkway can enhance both the functionality and aesthetics of your outdoor space. Here’s how to approach this:
Plan Your Design
Before you begin, take the time to plan your design carefully. Determine where you want to incorporate steps or a walkway, considering both practicality and visual appeal. Mark the locations to ensure a well-thought-out layout.
Use Proper Materials
When constructing steps or a walkway in your rock garden, it’s essential to use sturdy and visually pleasing materials. Some options include:
- Stone: Natural stone steps and pathways offer a rustic and timeless look.
- Pavers: Concrete pavers provide a clean and uniform appearance, available in various colors and styles.
- Concrete Blocks: These can be used to create functional and modern-looking steps or walkways.
Construct with Precision
Follow these steps to ensure the proper construction of steps or a walkway:
- Prepare the Base: Dig a trench where the steps or walkway will go, ensuring it is level and adequately compacted.
- Install a Base Layer: Add a layer of sand or gravel to the trench, creating a stable foundation.
- Lay the Materials: Place your chosen materials (stone, pavers, or concrete blocks) according to your design plan.
- Secure and Level: Ensure that each element is securely positioned and level. You may need to adjust the materials as you go.
- Fill Gaps: Fill any gaps between the materials with sand or gravel and compact them for stability.
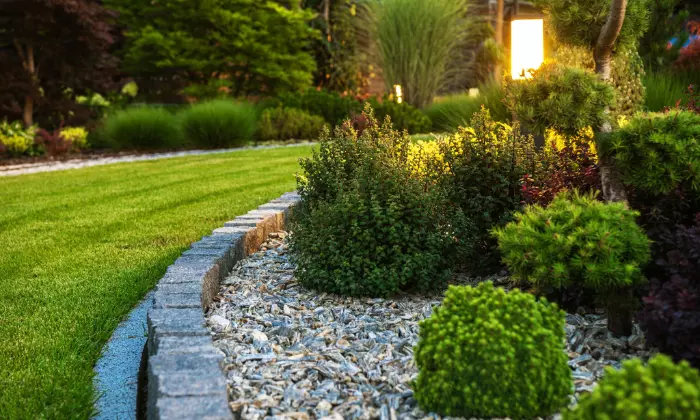
Install Edging
Edging not only adds a polished look to your rock garden but also keeps the rocks contained.
Select Edging Material
Choosing the right edging material is essential to achieve both functionality and aesthetic appeal. Some common edging materials include:
- Metal Edging: Durable and sleek, metal edging is an excellent choice for a modern look.
- Plastic Edging: Lightweight and cost-effective, plastic edging is easy to install and comes in various styles.
- Natural Stone Edging: If you want a seamless blend with your landscape rocks, natural stone edging provides a harmonious appearance.
Install Edging Properly
Follow these steps to install edging effectively:
- Plan the Placement: Determine the perimeter where you want to install the edging, ensuring it encircles your rock garden.
- Dig a Trench: Dig a shallow trench along the planned path for the edging. The trench should be deep enough to accommodate the height of the edging material.
- Position the Edging: Place the chosen edging material into the trench, ensuring it’s level and securely in place.
- Secure with Stakes: Use stakes or anchors to secure the edging further. These should be spaced at regular intervals along the length of the edging.
- Backfill: Fill the trench with soil or gravel up to the top of the edging material.
- Compact: Compact the soil or gravel to ensure that the edging remains stable and level.
Mix Things Up with Decorative Rock/Stone Size
To create visual interest and enhance stability, vary the size of your decorative rocks.
Mix Different Sizes
Combine rocks or stones of various sizes to achieve a dynamic and eye-catching arrangement. Here’s a step-by-step guide:
- Select a Variety: Gather rocks or stones in different sizes, including larger ones for focal points and smaller ones for filling gaps.
- Strategic Placement: Begin placing the larger rocks strategically within your rock garden, considering your overall design.
- Layer Smaller Rocks: Surround the larger rocks with smaller ones, creating layers of varying sizes. This technique adds depth and complexity to your landscape.
Layering
Layering rocks of different sizes is another effective method to add dimension and stability to your landscape design. Here’s how to go about it:
- Place Larger Rocks First: Start by positioning the larger rocks at various points in your garden. These can serve as focal points or anchor pieces.
- Build Up the Layers: Layer smaller rocks or stones around the larger ones, gradually working your way outwards. This technique creates a natural and aesthetically pleasing arrangement.
- Vary the Heights: To make the garden more visually interesting, vary the height of the rocks as you layer them. This creates a sense of depth and movement.
Additional Tips for Landscape Rock Maintenance
Maintaining to how to keep landscape rocks in place is vital to ensure they stay in place and retain their beauty over time. Here are some extra tips to help you keep your rock garden looking its best:
Regular Weeding
Periodically inspect your rock garden for weeds and remove them as soon as they appear. Weeds can not only disrupt the aesthetics of your rock garden but also compete with your low-maintenance plants for nutrients and space. Be thorough in your weeding efforts to prevent weeds from taking root and causing issues.
Rock Positioning
After severe weather conditions or shifting due to natural settling, take the time to reposition any rocks that have moved out of place. Properly aligning the rocks ensures your rock garden maintains its intended appearance and stability. Regularly check for rocks that may have shifted, especially after heavy rainfall or strong winds. If you’re looking for modern white rock landscaping ideas, incorporating precise alignment techniques can contribute to a sleek and contemporary design for your outdoor space.
Check for Drainage
Proper drainage is essential to prevent water from pooling around your decorative rocks. Standing water can erode the landscape fabric and disturb the stability of your rocks. Ensure that the area around your rock garden has adequate drainage to prevent these issues.
Refresh Mulch
If you’ve used mulch in your rock garden design, consider refreshing it periodically. Mulching service helps retain moisture, suppress weeds, and adds a finished look to your garden. Over time, mulch can break down and lose its effectiveness, so replenish it as needed.
Inspect Edging
Regularly inspect the edging around your rock garden to ensure it remains secure and intact. Over time, edging materials may shift or become damaged, compromising the containment of your decorative rocks. Repair or replace any damaged edging promptly to maintain the garden’s appearance and stability.

Conclusion
Creating a stunning landscape with rocks requires careful planning and maintenance. By following these steps and tips, you can keep landscape rocks in place while beautifying your outdoor space. Don’t wait any longer to transform your outdoor space. Contact us now and embark on the journey to create your dream white rock landscape.
FAQs
How Often Should I Check For Weeds In My Rock Garden?
Regularly inspect your rock garden for weeds and remove them as soon as they appear. This will prevent them from taking root and causing issues.
Can I Use Any Type Of Plants Between The Rocks?
It’s best to choose low-maintenance plants that won’t overcrowd the rocks. Succulents, groundcovers, and ornamental grasses are excellent options.
Do I Need To Reposition The Rocks Frequently?
You may need to reposition the rocks after severe weather or if you notice any shifting. Regular maintenance will help keep them in place.
What’s The Best Way To Vary The Size Of Decorative Rocks?
Mixing different sizes of rocks and layering them can create a visually appealing and stable landscape design.
Is Landscape Fabric Necessary?
Yes, using landscape fabric is essential to prevent weeds from growing through and to maintain the integrity of your rock garden.